Showing posts with label Recipes. Show all posts

Tuesday, January 21, 2014

Freezer Meals for New Moms | Chicken Pot Pie


Last week I started a Mini Series on making freezer meals for New Moms. 


When my sister-in-law got pregnant with her second, I told her that I would make her one week's worth of freezer meals.  She plans on nursing this baby, so I needed to make sure that the meals I made would be safe for a newborn's belly (not taking into account gluten & dairy).  When I started googling freezer meals for nursing moms, I couldn't actually find anything that recommended good recipes.  So I came up with my own list.

White Pizza
Chicken Potpie
White Lasagna
Chicken Fajitas (light on the Onions)
Meatloaf
Poppy Seed chicken
Baked Mac n Cheese
Chicken Pot Pie

First, you need to start off with a pie crust.  If you want to save time (and lack flavor), you can buy one.  I don't recommend it.  There is nothing  better than a homemade pie crust.

There is homemade pie crust.  And then there is homemade pie crust made with coconut oil. 

I've used the same pie crust recipe for years.  Like, since I made my first pie. 

Let me tell you what.  This Coconut oil Pie crust blows my recipe out of the water.  Here's the thing.  Coconut oil is different than lard.  It turns to liquid at a lower temperature than lard does.  So after you make the dough you have to refrigerate it for an hour or so before you roll it out. 

Also, if you are going to freeze the pot pie, let the chicken mixture cool before you put the crust on the top.  If you are baking it right away, you'll put the crust on immediately.  Just make your slits before you put the crust over your pie pan.

Coconut Oil Pie Dough
(Makes 1 crust, double if you are making 2 pot pies, or if you are making a pie that need a double crust)
 
1 1/2 cups all purpose flour
1 tbsp sugar
1/2 tsp salt
1/2 cup coconut oil, room temperature
4-7 tbsp water, cold


1.) Mix together Flour, Sugar, & Salt
2.) Cut in coconut oil using a pastry cutter or your fingers.  You'll want the coconut oil to break up and mix in with the flour mixture.  You do not want any chunks of coconut oil that would be larger than the end of a pencil eraser. 
3.) Using a fork, mix in the water 1-2 Tbsp at a time.  The water needs to be VERY cold.  (Often times, I will make a glass of icewater and get the water from that.)  Add just enough water for the dough to almost come together in a ball. 
4.) Form dough into a ball with your hands, wrap in plastic, and refrigerate for at least 60 minutes.


Now on to the innards of the Pot Pie.  I'm going to give you 2 recipes.
 
My sister gave me a recipe for Pot Pie that she swears by:
 
1 Can Cream of Chicken
1 Can Cream of Potato
1 Can mixed Veggies (Called vergo)
2 cans of chicken
 
Mix together .  Place in Deep  Dish Pie Pan, add top crust.  Bake at 400 for 1 hour.
 
I am not a HUGE fan of cream of anything.  If I had just been making this for my sister in law I would have used the above recipe.  But, I wanted to make one for us for dinner so I could try out my new pie crust recipe, so I found this recipe....
 
Pot Pie
Picture from The Pioneer Woman, where I found this recipe, since I am a SUPER SLACKER and forgot to photography my finished poduct!!
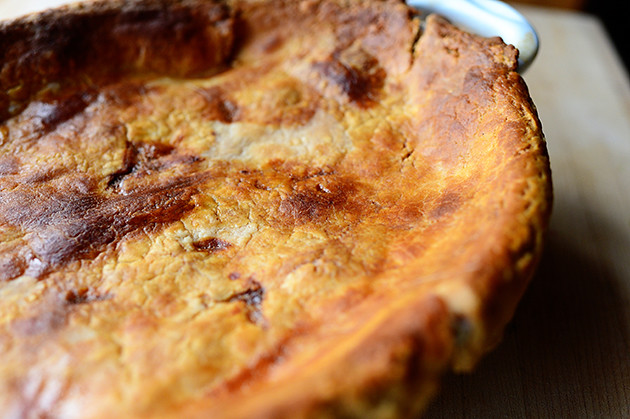
 
 
Chicken Pot Pie
(Preheat oven to 375 if you're not freezing)

 
4 Tbls Butter
1/2 cup finely diced onion
1/2 cup shredded carrot
1/2 cup diced celery
3 cups shredded chicken
1/4 cup flour
3 cups chicken broth
Salt & Pepper, to taste
1/4 cup half & half or cream (I used regular milk)


  • Melt Butter in a large sauce pan.
  • Add Onion, carrot, and celery until onions are translucent, about 5 minutes
  • Mix in Chicken.
  • Sprinkle flour over mixture, and stir in.  Cook for 1 minute
  • Pour in Chicken Broth and stir until it starts to thicken.
  • Salt and pepper to taste.  (You can also add in garlic and turmeric if you want)
  • Slowly add in cream, stirring until the mixture bubbles up and thickens.  If it seems too thick you can add more.
  • Pour into Pie Pan or a Casserole dish.
  • Roll out Pie dough and place over the top of the Pan. 
  • Seal edges around the pan so it doesn't pull apart as it bakes
  • Bake for 25-30 minutes until the crust is deep golden brown and the inside is bubbly
 

I ended up making 2 pies out of this, but I also didn't measure everything exactly.  Remember, I'm just a dump until it looks good kind of girl.  If you are making this for a family larger that 2-3, you might want to bake it in a 2 qt baking dish instead of a deep dish pie pan.
 
To get the crust a lovely golden brown...Mix an egg with 2 Tbls of water and brush the mixture over the crust. (you won't use all of the egg mix)  It will give your crust a wonderful golden brown finish.
 
Make sure to cut slits in your pie crust or it will puff up! 
 
If you are freezing, let the mix cool completely before adding the crust.  Also, do not add the egg mixture to the top pie crust.  Wrap the Dish in plastic wrap, and then wrap it with aluminum foil.  The better you wrap it, the less chance it has to be freezer burnt.  Make sure to label it & leave good instructions for the new mom for baking! I usually will just write it directly on the Aluminum Foil. 
 
I would recommend for her to let it thaw, and then bake it for 60 minutes.  It can be baked while it is frozen, but it will take a lot longer, and I think the crust will get over baked.
 
If you have any questions, just let me know!


Wednesday, January 15, 2014

Freezer Meals for New Mom's | White Pizza {Recipe}


I think that Freezer meals are one of the best gifts that you can give a new mom.  For the first week or two there are going to be swarms of people bring them meals.  And you know that if there is out of town family there will be several weeks at the beginning when someone is staying with them to cover the cooking.  But what happens after the first month when the visitors and meals cease?  FREEZER MEALS. 

When My sister-in-law was due with my 1st Nephew, I told her that for her shower gift I would make her some freezer meals.  I didn't think twice about the fact that the food the Mom eats if she's nursing can make baby's tummy gassy.  Major Aunt Fail.

Well, she's pregnant with their 2nd, and it's time for me to start thinking freezer meals again.  But this time I'm going to be smarter about it!  Baby B had a terrible time with gas, and so I'm taking as many precautions as I can with this round of freezer meals for Baby C.

Do you know how hard it is to come up with meals that freeze well that don't include foods that could potentially cause babies gas?  IMPOSSIBLE.  Nothing tomato based.  No Beans.  No Leafy Greens.  Onions to a small minimum.  Sparse use of Garlic.  Nothing too spicy.  I didn't even get into the dairy or gluten aspect of it! 

I have come up with a list of 7 Recipes that I am going to share with you over the coming weeks.

White Pizza
White Lasagna
Chicken Fajitas (light on the Onions)
Meatloaf
Poppy Seed chicken
Baked Mac n Cheese
Chicken Potpie

White Pizza
 
Frozen Pizza's are seriously the best "quick" meal ever, but they just never quite hit the spot like a good homemade pizza does!  Well, I'm going to attempt to freeze my own pizza. 
 
I don't believe in buying a store bought pizza crust.  It's way too easy to make my own, and it tastes 10x better.  No judgments from me if you use store bought pizza dough.  Although, I have no idea which kind to recommend, or even how they work, so you'll have to figure that out on your own!
 
Pizza Dough
 
1 1/4 c Wheat flour
1 T yeast
1/2 tsp salt
2 T oil
1 C. warm water
1 1/3 c. Wheat Flour
 
1.) Preheat oven to 400 degrees. 
2.) Combine 1 1/4 C Wheat Flour, Yeast & Salt in a large bowl
3.) Add oil & warm water to the mix, and whisk together
4.) Gradually mix in 1 1/3 C. Wheat Flour.  You'll want to roll up your sleeves and get your hands dirty for this! 


5.) Knead until you get a soft ball of dough
 
 
6.) Rinse & dry & place dough in greased bowl.  Cover with a damp towel and let rise for 20-30 minutes


7.) This dough is a little "tougher" than a white flour dough, so I tend you use a rolling pin to roll it 
      out to fit my pan!
8.) Bake dough, on a well greased pan for 7-10 minutes.  You just want to "par bake" it, you don't  
     want to bake it all the way through!
     **note, if you are making this pizza for dinner TONIGHT, then skip step 8 and add the toppings!
9.) Pop crust out of pan and allow to cool.
 
White Sauce
 
1/4 C. Butter
1/4 C. Flour
2 C Milk (or Cream if you want a richer taste!)
Salt & Pepper to taste
 
1.) Melt butter in a medium sauce pan. 

2.)When butter is melted, stir in flour.  It will be a thick paste. 


3.) SLOWLY add milk, little by little, whisking with a fork as you go.  If you add it all at once you'll have chunks.  That's a no go. 


 4. Cook on Medium Heat, salt & Pepper to state, and constantly stir until Sauce thickens.  Remove from heat.


Chicken Bacon Pizza Toppings
 
I was trying to come up with a white pizza that didn't incorporate just tons of cheese and garlic.  I couldn't really find anything that I liked the sound of, so I just decided to throw something together.
 
1 -2 Cooked Chicken Breasts, shredded or cut up into small pieces
1 container of mushrooms, sliced 
1-2 Handfuls of spinach chopped into small pieces (I use scissors!)
4-5 Slices of bacon
mozzarella Cheese
 
1. Fry Bacon, cut up into small pieces
 
2. Sauté mushrooms and spinach, salt & pepper to taste

 
3. Put Pizza Crust back on Cookie sheet lined with parchment paper.
 
4. Spread Desired amount of white sauce over crust
5. Spread desired amount of Cheese over Sauce
 
6. In a bowl, mix together Chicken, Mushrooms, Spinach & bacon Together.
7. Top pizza with Mixture.
 
8. Put Pizza in the freezer to flash freeze.
9. When The Pizza has begun to harden, remove from freezer.
10. Wrap tightly with plastic wrap.
 
11. Wrap with aluminum Foil.
 
12. Freeze
13. Make sure to write out instruction for how to bake!


To Bake:
 
Place Pizza on a cookie sheet, and bake in an oven preheated to 400 degrees.  Bake for 15-20 minutes until heated through. 
 

What freezer meals have you found that work well for new moms that are nursing?


Tuesday, January 14, 2014

Tasty Tuesdays | Japenese Fried Rice & Yum Yum Sauce {Recipe}


So, I don't know about you, but I LOVE going to a hibachi grill.  I usually get sushi, but their fried rice & yum yum sauce are to die for!

I made fried rice with yum yum sauce well over a year ago and it was a huge hit.  The recipe got pushed to the back of my recipe book and was promptly forgotten about.

Last week, out of the blue, I just started craving fried rice!  I may or may not have cooked fried rice for dinner TWICE that week.  It was that good.

Here's the thing with fried rice.  The best fried rice requires just a tad bit of planning ahead, because you really need to cook the rice the night  before.  I didn't do that either night, but I remember from making it before that it helps with the consistency of the rice.  Don't forget to check out my "perfect rice" tip!  We did find out that this works out best if you are using Jasmine rice!

Another tip before I get on with the recipes.  While you are cooking the rice the night before, go ahead and mix together the yum yum sauce.  The flavor gets better as it sits over night!

Oh...just one more!  Sesame Oil is NOT OPTIONAL!  It adds something to it that you just can't replicate or do without, so just trust me!  So buck it up and buy a bottle of it.  It's a stable oil so it will last you a really long time!  I get mine at the ethnic store in Memphis where it is way cheaper than at Kroger!


Yum Yum Sauce


1 cup Mayonnaise (I used 1/2 mayo, 1/2 greek yogurt)
3 Tbsp White Sugar
3 Tbsp Rice vinegar
2 Tbsp Butter, Melted
¾ tsp. Paprika
½ tsp garlic powder
Cayenne pepper, to taste
Mix together.  Refrigerate 4-5 hours for optimal flavor.


Japanese Style Fried Rice
Meat of choice, cut into small pieces Optional
3-4 C. cooked fried rice (day old is the best!)
3 tbsp Sesame oil (not optional, no substitutes!)
1 tbsp. Butter
¾ - 1 c. frozen peas & carrots
1 onion, chopped
2-3 Eggs, scrambled

2 tsp. minced garlic
1/3 c soy sauce, or to taste

1.) In large skillet cook meat, seasoned to taste, set aside.

2.) Heat butter & oil in skillet3.) Sauté Garlic, onion, peas & carrots until tender.

4.) While vegetables are cooking, scramble eggs in a separate skillet


5.) Add eggs, rice, soy sauce & meat to vegetables and mix together


6.) Stir fry until heated through.
 
You'll want to add this to your menu this week. We made chicken fried rice one night, and steak fried rice another night.  Both were equally good! 

Make sure to let me know how it turns out!


Friday, November 15, 2013

Homemade Honey Mustard & 1000 Island {Salad Dressing}

Happy Friday Lovelies! 

So y'all already know that I'm pretty much on a health rampage.  I'm pretty sure that some people have even used the term "health freak" when describing me lately.  Maybe I've gone a little cra-cra....but I'm okay with that.

My latest tirade was on Salad Dressing.  Have you ever looked at the ingredient label on Salad Dressing?  On 4 out of 5 of the salad dressings I threw out this morning the first ingredient was soybean oil, which was in and of itself enough for it to land in the garbage.  But, if that wasn't enough, the 2nd ingredient in ALL of them was high fructose corn syrup.  I didn't even bother reading any farther. 

I was making this lovely salad to take to my sister-in-law's house for dinner tonight...


Looks super yummy, doesn't it?  It's chalk full of Mixed Greens, slivered almonds, Spinach, Onions, Red Bell Peppers, Peas, chopped mushrooms, and eggs that were all chopped up so that each bite has a little bit of everything in it!  It's the best way to sneak some veggies in their without people really knowing they are in there! 

Well, I already knew before looking that the salad dressings in my fridge just weren't going to make the cut on our "no processed food rule" in my house, so I decided to make my own 1000 Island & Honey Mustard dressing.

I just tasted a tiny bit of the 1000 Island dressing, because it DOES have some dairy in it because I used half mayo & half yogurt, and dairy apparently make my body hate itself and flip out, and it tasted pretty decent, so I had the Mr. come and try it out. He ate a whole spoonful of it and loved it.

Then I whipped together a honey mustard recipe.  My MR. is pretty picky about Honey Mustard dressing, and really only likes the creamy kind made out of Mayo, and I just didn't have the energy to make my own mayo last night.  It's on my to do list of new things to make, but last night just wasn't the night.  If it's the least bit spicy or twangy then he doesn't like it!  Well, the recipe I tried was on the twangy side, but I happened to like it!


And then this happened...


Story of my life.  I actually dropped BOTH jars of dressing, but thankfully the jar full of 1000 Island miraculously didn't break.

I cleaned up the mess, and then went to bed.  I just didn't have it in me to make it all over again last night.

So this morning I found a different recipe for the Honey Mustard Dressing that is the freaking bomb dot com.  Still doesn't have the Mayo in it (sorry babe!), but it's SOOOO delish.

I decided after finding out how easy it is to make homemade dressing that I will never buy store bought dressing again, unless of course I am in a pinch and have no other option!  That is what got me looking at the ingredient labels on Store bought salad dressings!

Of course by now you are DYING to know the recipes that I used for these awesome Salad Dressings, Right???

1000 Island Dressing
(Makes around 2 cups, so you could easily half the recipe if it's just for a few people!)


1/2 cup Mayo
 1/2 cup plain greek yogurt
1/4 cup Ketchup
1/4 cup sweet pickle relish
1 Tbls finely diced onion
1/2 tsp minced garlic
2 tsp white vinegar
1/8 tsp salt + more to taste
Black pepper, to taste
3-4 dashes tabasco sauce (optional, I used garlic tobacco sauce and it adds a nice element to the dressing!)
3-4 hard boiled eggs, diced (this sounds a little weird, but just add them, it's so yummy!)
Mix everything together, and add more salt if needed!  Easy Peasy! 

Honey Mustard Dressing
(This filled about 1 1/2 of the canning jelly jars, so probably around 1 1/2 cups of Dressing)


1/2 cup Coconut Oil, melted
3 Tbls Mustard
3 Tbls Dijon Mutard
1/3 cup Honey (you can add more later if you want it to be sweeter!)
2-4 Tbls Apple Cider Vinegar (to taste, just depends on how twangy you like it!)
1 pinch salt, to taste

I chose to use Coconut oil, but you could use olive oil as well!  I just put everything together in a blender and mixed it together for a several minutes!  My thinking was that if I mixed it enough then the oil wouldn't separate from it, but we'll see how that goes!  This dressing is oh so tasty!


I have several other new salad dressing recipes that I'm going to be trying out, so I have created a new tag just for salad dressings so you'll be able to find them a little easier in the future!

I hope you enjoy!

 photo Signature_zps2937fcf1.png

Monday, November 4, 2013

Not Icecream Desserts {recipe}

As you may, or may not know, the MR and I are trying desperately to live healthier lives.  We are making better decisions about our health by the foods that we choose to eat and getting some physical activity into our days. 

For the first year or so of our marriage we were fairly good about eating healthy.  When we started looking for houses and then the whole moving process, and getting settled process, our whole routine got out of whack and we formed some really bad habits.  I completely quit being gluten free, we would make stops by the store after work and get frozen pizzas & icecream, eat Mexican food rather than cook dinner, and instead of packing lunches, the local gas station (that has the best chicken fingers EVER), subway & Wendy's became the norm for lunch.  Let's not even get into breakfast...  Not only was it bad for our budget, but we both felt like crap.  We had gotten into a rut and couldn't dig ourselves out.

I don't know what clicked, but finally one day I had had enough.  I was tired of being tired all the time, I was tired of feeling like crap, I was just tired of being unhealthy.  We decided together that enough was enough and I started preparing healthy meals for us.  Now instead of crappy breakfasts there are Egg omelet muffins that are frozen and easily thawed and reheated, refrigerator oatmeal (if I can remember to make it up!), yogurt, fruit, or a quick meal of scrambled eggs.  For lunches it's either leftovers, chicken-salad salad (chicken salad served over a salad!), made with greek yogurt instead of mayo, egg-salad salad, also made with greek yogurt , or grilled chicken salad.  I also started meal prepping and planning again which prevents the after work dilemma of "I have no idea what's for dinner, and I don't feel like cooking!"  Snacks mainly consist of either nuts, fruit, or yogurt!  

Our household is also mainly gluten free mostly for my sake!  This means that there is a whole lot of experimenting going on in my house!  We've tried spaghetti squash, cauliflower pizza crust, spaghetti squash pizza crust, dinners served over vegetables instead of rice!  There are several more things that we will be trying out in the future, but for the most part everything has turned out well.  I am still avoiding dairy, legumes, and corn, but the MR. still eats those!  And we avoid most sugar!

We also got a new gym that opened up 5 minutes from where we work.  Initially, it was just me that was going to go.  We get up around 5:15, and are headed out the door by 6:00, if not earlier.  This requires more work on my part at night.  I get lunches packed, and my gym bag packed so all I have to do is get dressed and zip out the door, and this is after dinner is cooked and cleaned up!  The MR. kindly drives to work in the morning so that I have 30 extra minutes to try and wake up, I am NOT a morning person by any stretch of the imagination.  He drops himself off at work, and I hop over to the driver's seat and head back out to the gym for a 30-45 minutes work out.  The MR. decided last week that He wanted to go ahead and join the gym as well.  So we signed him on up, and went and got him some good tennis shoes {the $20.00 walmart ones just weren't going to cut it!}.  Now 3 days a week, after work we are going to head back to the gym.  We'll warm up with a little cardio and then get some weight training in.  Today is the first day of our new routine!  I could just go at night with him, but I'm a morning workout girl.  If I don't get my cardio session in first thing in the morning, it's not going to happen at all.  We also got this beauty out of the scrap pile about a month or so ago....

     
Pretty nice, huh?  What's really nice is that it's big enough to fit my 6'3" MR. on it.  The one we had before was made for a 5'6" or shorter person!  We had to replace the console on it, but it was SO worth it.  This machine runs right around $1000.00 new.  So on the days that we don't do weight training after work the MR can still get some cardio in after work! 

Back to the "no sugar" thing.  It's REALLY, REALLY hard, especially for My MR.!  Sometimes you just need something sweet after dinner, ya know?  I usually get bananas and let the ripen to the point that they wouldn't be any good for eating, and then freeze them for Banana "Icecream", which we love!  I also have a gallon size bag of frozen grapes in the freezer!  It's the perfect fix for a sugar craving!

Which brings me to the Not Icecream Desserts.  We LOVE, LOVE, LOVE icecream.  It's the perfect ending to a long day!  So I started making Banana Icecream, and it's So Easy!

Basic Banana "Ice cream":
2-3 frozen bananas
1-2 tsp vanilla
Milk of your choice

But the bananas and vanilla in the blender.  I usually defrost my bananas just a touch in the microwave before I put them in my blender so they aren't rock hard.  Turn on the blender and let it break up the bananas a little bit.  With a spatula, push the bananas down off the sides of the blender.  You'll only want to add as much milk as you must to get an "ice cream" consistency, too much and it gets too runny!  You'll also have to scrap the sides a few times to get all the banana chunks whipped up into a smooth goodness!

This recipe is pretty much just a "base".  It's really tasty simple as is, or you can get creative with it and add other fruits!

I've made "jamoca almond fudge icecream" by adding some ground up bitter sweet chocolate chips, almonds, and using cold coffee instead of milk.  It was a huge hit!  If you make this, you'll want a little stronger cup of coffee, and I store it the "extras" in the fridge, but you can also make some coffee ice cubes and it will work great too!"


But....my newest favorite dessert is Whipped Chocolate & Peanut Butter "ice cream"

I came across this recipe on pinterest.  At first it sounds really, really gross.  But, even my MR. approves so....here it goes!

Whipped Chocolate & Peanut butter "ice cream"


1 avocado, peeled, and mashed
1 to 1 1/2 frozen bananas
3-4 Tbls cocoa
1 t. vanilla
1 t. cinnamon
Peanut butter, to taste (optional) {all natural peanut butter is preferable!}

You are definitely going to want to mash of the avocado before putting in in the blender.  This will help alleviate having chunks of avocado in your "ice cream".  Then add everything into your blender and mix together!  It was amazingly good.  I only had a small bite of it because I'm trying to avoid peanuts, but the MR ate the whole bowl without a complaint!  

This recipe originally didn't call of peanut butter, so you can easily make it without!  It also made a probably 1 1/2 cups, so it's either a perfect "small" dessert for 2 people to share, or a greedy sized dessert for one!  The original pinterest pin had the ingredients doubled, and in my opinion it would easily feed 3-4 people!

If you like a chocolate raspberry combo, I but you could stir in some frozen raspberries to this for a lighter option, or just make it without the peanut butter!  The avocado & peanut butter option has quite a bit of fat in it, (good fats though!) but it sure it yummy!  

Bon Appétit!

 photo Signature_zps2937fcf1.png

Wednesday, October 30, 2013

Chicken Noodle Soup {Recipe}

Happy Hump Day All!

Today, you will find me over at Health, Love & Fire, for my first ever guest post! 

 photo winecountrywelcome_zpsde240906.png


The Lovely Libby is a newbie blogger like myself, and I have really enjoyed getting to read through her blog!  SO...In order for you to get my Chicken Noodle Soup Recipe, which I just know you are DYING to get your hands on...you'll have to go her blog and check it out!  So....What are you waiting for????


 photo Signature_zps2937fcf1.png

Thursday, October 24, 2013

Homemade Chicken Broth

Happy THURSDAY!  This is, as you know, my favorite day of the week!  My MR. is home sick today.  He started feeling puny on Tuesday, and we both just figured he had a cold, but not I'm pretty sure he has the flu!  Body aches, headache, slightly swollen glands, and fever.  Not good.  Not good at all.  Every time he gets sick.  I get sick.  Every.single.time.  So, I'm taking care of him, while avoiding his germs like the plague.    I'm hoping to not get it this time, so I'm stocking up of Vitamin B,C,D & Cellver and drinking LOTS of water!. 

Last night when he was feeling so terrible I decided to make him some chicken noodle soup.  I'll be sharing the recipe next week!  But today I want to elaborate on how good bone broth is, and how simple it is to make!

Almost every Sunday, I roast a chicken in my crockpot.  It's such an inexpensive and simple thing to prepare, and we get a dinner and several lunches out of it.  Not every time, but every now and again I decided to make chicken stock out of the bones.  It's WAY better for you that the store bought kind, I think it tastes better, and it's basically free!

What are the health benefits of homemade bone broth? source source source

----> The gelatin in bone broth is REALLY good for your digestive system! 
----> It helps fight infection
----> The collagen and gelatin are really good for producing and growing healthy hair, skin & nails!
----> Because it is very high in anti-inflammatory amino acids glycine and proline it helps fight 
        inflammation
----> The amino acid, glycine, helps get the toxins out of your body

And a bunch of other things!

So.  How do you make your own homemade chicken broth?

It's SO easy.

Roast a whole chicken.  I usually do mine in the crockpot  If I'm making chicken broth after, I store the gizzards in the fridge until I am ready to make it!

When your chicken is done, let it set for a few minutes to cool and then debone it.  I find it is MUCH easier to debone a chicken when it's hot!

Put the bones & the gizzards back into your crock pot. 

Then, add in 2-3 carrots, 2-3 stalks of celery, some garlic cloves, and a decent sized onion, quartered.  If you have them, you can add in some whole bay leaves as well.

Fill your pot up with water, and set your crock pot on low.  I'll let mine cook anywhere from 12-24 hours. 

When you decided that it's cooked long enough, pick out the carcass & large vegetable pieces, and strain the broth though a fine mesh strainer to get all the little pieces out. 

Now you are ready to make a batch of Chicken noodle soup, or freeze it in Ziploc Freezer bags for a later use!  I usually freeze mine in quart size bags.  I'll lay them flat on a cookie sheet and let them freeze so they stack nicely in my freezer!

You can also make this in a large pan on the stove, but I'm never home long enough to watch it, so I prefer to use my crock pot!

See!  It's SO easy, and basically free!

And because this so far is a picture-less post, and it's THURSDAY...I'll toss in a little Throw back Thursday for the heck of it!
June of 2012.  Running the Luvmud 5k race.  My team was the "Dirty Divas".  It was a lot of fun, and I got REALLY muddy. 

 
Add caption

My First 5K race. EVER!  July of 2011.  I think I did it in <32 minutes="" p=""> 
April of 2011.  Snuggling my sweet niece!

 
That time I cut my hair REALLY short.  And LOVED it after the first month of hating it!


 photo Signature_zps2937fcf1.png